Getting started with C programming - Sample window  -
-
Certain things like opening a new window, drawing graphics, read mouse input, etc. cannot be done with C alone, they require you to make calls to the operating system. There are libraries like SDL that can simplify that process, but it's not actually very difficult to do it yourself. The Win32 API on Windows, which we'll use in this example, is very well documented.
The program in this page will open a window, draws a rectangle by writing pixels into memory, and responds to mouse and keyboard input to move that rectangle. It will look like this:
WARNING: If you're just starting out with C, I highly recommend reading the SDL example before this one. Doing everything manually can be overwhelming if you're not at least somewhat used to programming and looking at a bunch of code. Also, drawing graphics in this way (without a rendering system like OpenGL) is VERY slow, it works for simple programs but is not very practical for something like videogames.
This page is for Windows. I don't know how to do this on  Linux at this time, but you can check the Linux SDL version.
Linking with Gdi32
While we don't need to link our program with Windows, certain graphics/input features are in a separate system called "Windows Graphics Device Interface", or "GDI", and we need to link with that.
@ECHO OFF

set libaries=-lgdi32

gcc main.c   %libaries%   -o testprogram   && (
	testprogram
)
The program
I recommend putting Windows features inside your own helper functions, for example instead of directly using the Windows API to open a window, make your own "create_window()" function and put the Windows API code there. Certain Windows functions can be unnecessarily messy and have lots of weird quirks, so isolating them into their own place will make it easier to read your own code. This also makes it much easier to port your program to other operating systems since all you need to do is replace the helper functions.
Note that different operating systems work differently, so not everything is directly portable.
To start with, some global setup:
#include <stdlib.h> // For memory allocation.
#include <stdbool.h> // C did not have booleans (true/false) by default before version C23 (released in 2024), so you may need this.

#include <windows.h> // For most Windows-related functions. This header comes from the compiler, some compilers like TCC have incomplete Windows headers and thus don't give access to all Windows functions. Most of the weird functions and values in this example program come from here.
#include <windowsx.h> // Some GDI features come from here.

// Set this to false to close the program.
bool running = true;

// Position of our rectangle.
int box_x = 0;
int box_y = 0;
Color
Before we can draw pixels, we need some way to represent pixels. Most pixels/colors on computers are in 8-bit RGBA format, which is just 4 8-bit numbers (unsigned char) representing red, green, blue, and alpha (transparency). Windows uses the same format, except the positions of red and blue are swapped (RGBA -> BGRA).
Some people use a 32-bit integer unsigned int and do some bit-manipulation to modify it, but you can also just make a struct like this:
typedef  unsigned char  u8; // This makes the code a little bit easier to read.

// This struct should be correctly packed, but be aware that sometimes there may be empty space between the values in a struct.
typedef struct {
	u8 r;
	u8 g;
	u8 b;
	u8 a;
} Pixel;

Pixel get_rgb (u8 r, u8 g, u8 b) {
	return (Pixel){ r, g, b, 255 };
}
Pixel get_rgba (u8 r, u8 g, u8 b, u8 a) {
	return (Pixel){ r, g, b, a };
}
// We also need these because Windows uses colors in BGRA format.
Pixel get_bgr (u8 r, u8 g, u8 b) {
	return (Pixel){ b, g, r, 255 };
}
Pixel get_bgra (u8 r, u8 g, u8 b, u8 a) {
	return (Pixel){ b, g, r, a };
}
Rendering
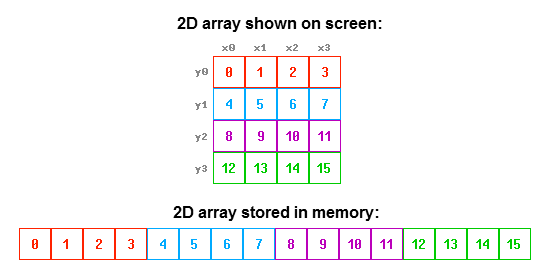
Next we need to put a bunch of pixels together to create an image or canvas. It's simply a big 2D array.
It is very important to understand that any 1D array can also be treated as a 2D array. If you're at the first cell of a 4x4 grid, and you move to the right by 4 cells, you will end up wrapping to the beginning of the next row. You can therefore get to the start of any row with y * grid_width, and any pixel in the row by adding x, so the "algorithm" to access any pixel in the image is y * grid_width + x.
typedef struct {
	int width;
	int height;
	Pixel* data;
} Image;

Image create_image (int width, int height) {
	Image image = {
		.width = width,
		.height = height,
		.data = malloc(width*height*sizeof(Pixel)),
	};
	return image;
}

void resize_image (Image* image, int width, int height) {
	// Note: this causes existing pixels to move into wrong positions, but we'll just re-draw the image so it doesn't matter.
	image->width = width;
	image->height = height;
	image->data = realloc(image->data, width*height*sizeof(Pixel));
}

void fill_image_with_color (Image* image, Pixel color) {
	int pixelcount = image->width * image->height;
	for (int i=0; i<pixelcount; i++) {
		image->data[i] = color;
	}
}

void draw_rect_on_image (Image* image, int xstart, int ystart, int width, int height, Pixel color) {
	// There's many ways to decide the positions and loop variables for drawing pixels, the method here is to get the start and end positions and loop from one to another. It's important to not access pixels outside of the image. For example if you try to write a pixel to [0,-1], it will cause a buffer underflow.
	int xend = xstart + width;
	int yend = ystart + height;
	// Prevent overflow from right/bottom.
	if (xend > image->width) xend = image->width;
	if (yend > image->height) yend = image->height;
	// Prevent underflow from left/top.
	if (xstart < 0) xstart = 0;
	if (ystart < 0) ystart = 0;

	for (int y=ystart; y<yend; y++) {
		for (int x=xstart; x<xend; x++) {
			image->data[y*image->width+x] = color;
		}
	}
}
Window
Next we need basic window handling, this is what actually requires the Windows API. This is roughly split in 2 parts: window creation, and event handling. The operating system will send us events that tell us what keyboard keys are pressed and when the window is moved and many other things.
typedef struct {
	int width;
	int height;
	HWND window_handle; // A "handle" that Windows uses to identify different windows. "Handles" in Windows are just pointers that point to some thing that only Windows understands.
	HDC	device_context; // Another handle that Windows uses for some graphics-related things.
} Window;

// Windows calls this function and sends events into it. wParam and lParam have information about the message, but you sometimes need special methods to extract useful values from them (such as GET_X_LPARAM to get mouse position). You can find lists of message types and information about them from these links:
// https://learn.microsoft.com/en-us/windows/win32/winmsg/about-messages-and-message-queues
// http://www.pinvoke.net/default.aspx/Constants/WM.html
LRESULT window_event_handler (HWND window_handle, UINT message, WPARAM wParam, LPARAM lParam) {
	switch (message) {
		// Left mouse button pressed.
		case WM_LBUTTONDOWN: {
			box_x = GET_X_LPARAM(lParam);
			box_y = GET_Y_LPARAM(lParam);
			break;
		}
		// Keyboard key pressed.
		case WM_KEYDOWN: {
			// Key codes for wParam are here: https://learn.microsoft.com/en-us/windows/win32/inputdev/virtual-key-codes
			// Alphanumeric keys have the same values as the relevant ASCII characters, so you can just use the character like below.
			switch (wParam) {
				case VK_UP:
				case 'W':
					box_y -= 10;
					break;
				case VK_DOWN:
				case 'S':
					box_y += 10;
					break;
				case VK_LEFT:
				case 'A':
					box_x -= 10;
					break;
				case VK_RIGHT:
				case 'D':
					box_x += 10;
					break;
			}
			break;
		}
		// Window closed. Note: there's several events for closing, but I think just this one is enough.
		case WM_DESTROY: {
			running = false;
			break;
		}
	}

	// This makes windows do it's own thing for this event (focus window when clicked, move it, resize it, etc). If we return 0, it will prevent the default functionality.
	return DefWindowProcA(window_handle, message, wParam, lParam);
}

// By calling this, Windows will send all the occurred events into our event handler function above.
void handle_all_window_events () {
	MSG windowmessage;
	while (PeekMessageA(&windowmessage, NULL, 0, 0, PM_REMOVE)) {
		// This translates keyboard input events (WM_KEYDOWN) and creates text input events (WM_CHAR) which are extremely useful if you want to read text input. They're not used in this program though. I don't know why you need to call this function manually.
		TranslateMessage(&windowmessage);
		// Send the message, this will cause Windows to send information about the event to our callback window_event_handler().
		DispatchMessageA(&windowmessage);
	}
}

// Open a new window.
Window create_window (int width, int height, char* titletext) {
	Window window = {
		.width = width,
		.height = height,
	};

	// You must register a "window class" before you make a window. I don't know why, maybe it helps 2 different programs create similar windows or something... note that if you want to create multiple windows, you can't create 2 classes with the same lpszClassName. You must either create 1 class and use the same name in CreateWindowExA, or create a new class with different name.
	WNDCLASSA windowclass = {
		.style = CS_OWNDC | CS_HREDRAW | CS_VREDRAW,
		.lpfnWndProc = window_event_handler, // Our event handler function above.
		.hInstance = GetModuleHandle(NULL),
		.hCursor = LoadCursorA(NULL, IDC_ARROW),
		.lpszClassName = "some_window_class_name",
	};
	RegisterClassA(&windowclass);

	// These can be used to set various properties, for example if you add WS_EX_TOPMOST to windowstylex, the window will always stay on top of other windows.
	DWORD windowstyle = WS_OVERLAPPEDWINDOW | WS_VISIBLE;
	DWORD windowstylex = 0;

	// Optional: fix window size. The size you provide to CreateWindow below includes the window border, so if you create a 200x200 window, the image on the inside will be smaller than that. Doing this will cause the image inside the window to be 200x200. Note that if you remove this, the window.width and window.height values will not represent the correct canvas size.
	RECT rect = {.right=width, .bottom=height};
	AdjustWindowRectEx(&rect, windowstyle, FALSE, windowstylex);
	width = rect.right - rect.left;
	height = rect.bottom - rect.top;

	// Create the window.
	window.window_handle = CreateWindowExA(
		windowstylex,				// DWORD     dwExStyle
		windowclass.lpszClassName,	// LPCSTR    lpClassName
		titletext,					// LPCSTR    lpWindowName
		windowstyle,				// DWORD     dwStyle
		CW_USEDEFAULT,				// int       X
		CW_USEDEFAULT,				// int       Y
		width,						// int       nWidth
		height,						// int       nHeight
		NULL,						// HWND      hWndParent
		NULL,						// HMENU     hMenu
		GetModuleHandle(NULL),		// HINSTANCE hInstance
		NULL						// LPVOID    lpParam
	);

	// I'm not exactly sure why this is separate from the window handle. It's used for various graphics-related things.
	window.device_context = GetDC(window.window_handle);

	return window;
}
We also need a function that puts our canvas onto the window, this isn't clearly a part of either rendering system nor the window system. This is a little weird because Windows wants a "bitmap image", so we need to fill in some bitmap info struct.
void display_image_on_window (Window* window, Image* img) {
	BITMAPINFO bitmap_info = {
		.bmiHeader = {
			.biSize = sizeof(BITMAPINFOHEADER),
			.biWidth = img->width,
			.biHeight = -img->height, // Negative value = use top-down pixel order. If this is positive, the image will be upside-down.
			.biPlanes = 1,
			.biBitCount = 32,
			.biCompression = BI_RGB,
		}
	};
	StretchDIBits(
		window->device_context,
		0, 0, window->width, window->height,
		0, 0, img->width, img->height,
		img->data,
		&bitmap_info,
		DIB_RGB_COLORS,
		SRCCOPY
	);
}
Using it all
And lastly, the main function where everything is called from.
void main () {
	// Create window.
	Window window = create_window(400, 300, "Test window");

	// Create a canvas where we'll draw pixels. You could include this as part of the Window struct if you wanted to.
	Image canvas = create_image(window.width, window.height);

	// Main loop. This is where most of the action happens.
	while (1) {
		handle_all_window_events();
		if (!running) break;

		// Fix the window size values for our own Window object in case the window was resized. Ideally you would do this when the window_event_handler receives a window resize event (WM_SIZE), but it's kinda compilated to find your own Window object from there. There's numerous ways to work around to it, but I did it this way to keep this example simple.
		RECT rect;
		GetClientRect(window.window_handle, &rect);
		window.width = rect.right - rect.left;
		window.height = rect.bottom - rect.top;

		// If Window was resized, resize the canvas too.
		if (window.width != canvas.width || window.height != canvas.height) resize_image(&canvas, window.height, window.height);

		// Fill canvas with gray.
		fill_image_with_color(&canvas, get_bgr(125,125,125));

		// Draw white rectangle at box_x and box_y.
		draw_rect_on_image(&canvas, box_x, box_y, 100, 100, get_bgr(255,255,255));

		// Display the canvas on the window.
		display_image_on_window(&window, &canvas);

		// Make the program wait 16 milliseconds before continuing to the next loop iteration (this causes the loop to run at roughly 60 FPS).
		SleepEx(16, FALSE);
	}
}
Notes
You could include Image as part of the Window struct if you wanted to. It's useful to define the Image as it's own type because then you can use the same rendering functions to manipulate images and to draw onto the window.
Splitting RGB functions into get_rgb and get_bgr isn't very ideal because you'd have to change all the function calls if you port this program to a platform that expects pixels in RGBA format. You could add a macro that changes the order on Windows-only, or you could add some kind of switch or option for it. It's up to you how to select between RGBA and BGRA colors.
Drawing graphics like this is pretty simple, but things will get more complicated if you want to load images, draw text, or play audio. I highly recommended using libraries for them. See the simple game example for more.
If you use a proper GPU rendering API like OpenGL, then you won't be drawing onto your own canvas like this. However, when you upload a texture to OpenGL, it will expect the same kind of pixel data as we used in this program.